 all images are (c) Kelley Maria
From Jacin: Is there anything prettier than mercury glass these days? I don’t know the exact moment I fell in love with this gorgeous accent, but let me tell you, I pretty much can’t get enough. When I made my daily stop over at Kelley Maria‘s gorgeous and inspiring blog and saw her tutorial to make your own faux mercury glass, I immediately reached out to her to see if she’d like to share it with all of you! And lucky us - she said yes! So here she is today {make sure to swing by her blog when you’re done reading so you can give her a hello!}
Hi everyone, Kelley from Kelley Maria here! I am thrilled to be guest posting today for Lovely Little Details! Thank you for having me. I often feature DIY projects on my blog and like to focus them around saving money because who doesn’t like to save money?
Today’s post features a tutorial on how to make mercury glass. I have always been a fan of mercury glass, but the stuff is so darn expensive so I set out to make my own in hopes of achieving a similar look while also saving money. Plus, it is way more fun knowing you made it!
I chose to do this project using goblets (that I got from a thrift store for $1 each) and I am going to use them as votive candle holders. Small votive candle holders turned into mercury glass would look great on tables at a wedding reception!

{Before}
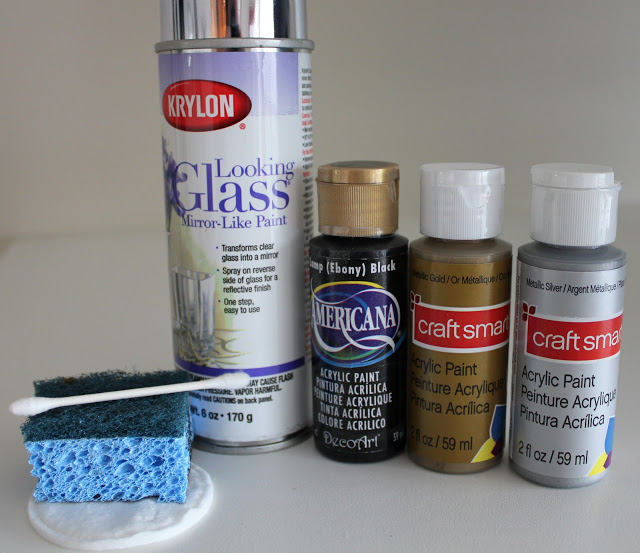
Supplies:
- Krylon Looking Glass Mirror-Like Spray Paint
- Metallic Gold Acrylic Paint
- Metallic Silver Acrylic Paint
- Lamp (Ebony) Black Acrylic Paint
- Sponge (cut into small pieces)
- Cotton Swabs
- Cotton Pads
- Clear glass candle holder
Instructions:
1. Spray the “looking glass” paint on the inside of goblet. Spray the bottom of stem base and lightly spray the stem as well. *Note: with Looking Glass Mirror-like paint you must paint the reverse of the side that will be showing. Spray 5 very thin coats, allowing 1 minute between coats. Paint sprays dull, but reverse side has mirror-like effect.

2. This next part is very tedious and takes patience! Dip the piece of cotton in the acrylic paint, switching off between metallic gold, metallic silver and black. Dab the inside of the goblet to remove patches of the spray paint. I switched off using the cotton swabs and pads. Repeat until you have the desired look. Next, dip the sponge in acrylic paints and “sponge” the inside of the goblet to add some color. Sponge the stem and bottom of the goblet as well. I used mostly gold and black for the sponge effect. Once paint has dried, repeat the process of removing paint from the stem and bottom of goblet.

{After}

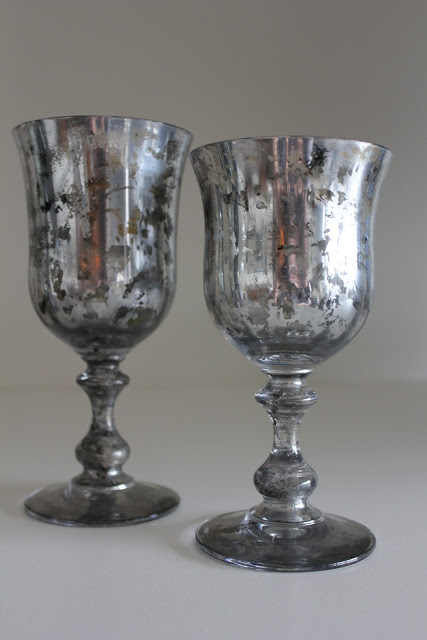

Are these not amazing?? Thank you Kelley for stopping by today! We hope you’ll come and visit us again soon!
Do you have a lovely DIY you’d like to share? Contact me!
For all DIYs, click here.










{ 40 comments… read them below or add one }
OMGoodness these are just fabulous!!! I love mercury glass, and this just makes it soooo easy to do! Thank you bunches for sharing ;-)))))
xoxo
kristi
Wow - looks exactly like the real deal. Thanks for sharing!
Such a great way to dress up simple glasses. They look so vintage and interesting!
I love this idea of turning simple glasses into something interesting and vintage looking! :)
Love!
This is so funny – I was just wondering if there was a good DIY somewhere online for mercury glass, and where do I find it but on LLD! Thanks Kelley and Jacin!
This is so brilliant. I was just talking about this with my friend. Im going to send this over to her. She will love it. happy Thursday, my dear
Kisses
I love this. Super cool!
i love the mercury glass look - and this is so doable (& affordable!)
I was just watching a tutorial last week that used Looking Glass spray paint. I’m going to need to go pick up some of that!
Great tutorial… I love the way that looks!
That is soooooo cool!
wow! These are fantastic, I’m def. going to try my hand at them!
very cool! going to try it!
Love this! Thank you for sharing :) I will be making some for my wedding I think!
Those are awesome! i think we did something like this in high school chemistry class….
LOVEEEEEEEEEEE. I wish I knew this before!!
Wow, that looks fantastic!! I think I have something to add to my to do list. :)
Awesome! really, I’ve been searching for a way to bring the ‘chic’ into our wedding. I think this will be a glamorous touch to our wedding decor! eeek! I’m so excited!
xo
Loooove!
These. Look. WONDERFUL! I’m afraid I don’t have the patience to try that myself, but I love the after images - they look incredible! What a great idea, and you’re right, they would look lovely as centerpieces.
What a fantastic DIY!!! I’d love to say I’ll try this one day.. but we’ll see :-)
Wow- fabulous, thank you!
How clever and gorgeous! I can’t wait to give this DIY a whirl!
What a cool DIY! Looks a little tedious, but maybe one day I’ll be ambitious ;)
This is awesome! I wanted to use Mercury glass for my wedding, but thought it was too expensive. Now I can make my own. Thanks!!
Nice share!! I am definitely going to use this idea for some events. Thanks!! Lovely to have found your blog through Kelley Maria. Newest Follower!! 400 :)
best, tamra
tamrasanford.blogspot.com
what a cool project! i love the look of mercury glass : )
tgif
LOVE this idea! I’ve got tons of white milkglass on the mantle at home, but I’ve been thinking of swapping it out for mercury glass but it does get expensive. Great alternative!
P.S. - Love the new site. I’m catching up on blogs (again) & just realized you switched to wordpress. ;)
my wedding decorations were very similar! but i took the easy way out and prebought it like this…
This is fantastic!!! Thanks for sharing!
Its really classy! Note how its looks like antique silverware from far :)
THANK YOU - I have been looking for this exact DIY for my wedding. But serious question, can vases hold water without ruining the effect after this finish has been applied?
hi. noticed your question and tho i’m not an expert, every blog i’ve read that mentions using them for flowers says *not* to place water in direct contact with the paint. rather, use a smaller glass cylinder inside the mercury glass one to hold flowers. hope that helps.
After looking at *countless* blogs, your directions are the most clear and your results are astonishingly good. Thank you. I’ve been sourcing mercury glass pendant light fixtures for my kitchen -and they are in excess of $200.00 each (ouch, and I need 5). If, with your instructions I can make something half as beautiful as you’ve done, I’ll feel *so* successful. (And I’ll save about $850.00 in the process). Thank you!
I have started this project, following your instructions and so far I have really enjoyed the look! I have one tip for anyone attempting this project… do it in WARM weather. The first set I tried was in 60 degree weather and the paint ran a LOT. When the temp was closer to 70, SUCCESS!
Love what you did ….where do you get the mirror spray?
I have followed your tutorial and made some beautiful mercury glass containers…thank you so much for posting this. One quick question I have for you, today I filled my mercury glass with wax and created a candle. After finishing the project I freaked wondering if we could actually light the candles or if because the spray paint was used on the inside they are no flammable? Anyone have any experience with this and/or lit any candles inside of their mercury glass containers? I would go out and light mine now but they are still liquid!
Thanks so much for any input!
How can I make gold mercury glass? Will regular spray paint work? I can only find the looking glass paint in silver. Thanks!
Beautiful!! Just one note, when using a food serving dish, be sure and write, in little letters, on the bottom - NOT FOOD SAFE… This can be easily done with a fine point Sharpie… and write in very small letters so it won’t take away from your beautiful work.
You know this, but someone down the years may not know that this item is not food safe
Awesome idea… thanks for sharing…
{ 3 trackbacks }