header
blog


{image from my iPhone, shared via instagram}

Remember C+C’s wedding that I was prepping for in May? I’m pretty sure I mentioned the driftwood arch but had never really gone in to the details of how we built it. Cary had mentioned that she envisioned a beachy, driftwood arch and of course I said “no problem!” I had never built an arch before but that wasn’t going to stop me from trying. After searching the flower mart and asking my SF florist friends where I could get one, I was not able to find one.. anywhere. So the next logical thing that came to mind was to make it (ha!).

The funniest thing, besides building this contraption in my backyard with my trainer, Jonny, who I roped in to help me volunteered to help, was when Cary decided to provide all the driftwood by scouring local beaches. Wait, that’s not the funny part. My personal favorite (and I wish I got a picture) was when Cary showed up to my apartment one Saturday morning and texted me saying “I have the driftwood!” Guys - she has a mini cooper convertible. You should have seen all these HUGE (like 6′ tall) pieces of driftwood lodged in that tiny car. It was priceless! And we had our first material all set :)

Here’s how we did it…

Materials
- (2) 5 gallon industrial buckets from the local hardware store
- (1) 60 lb bag of quick set concrete
- (1) 4′ metal pipe used to stir the concrete (just buy the mini concrete mixer next time, trust me)
- driftwood pieces - we used 5-6 pieces in total
- twine
- drill & wood screws
- burlap or some kind of fabric to match your decor
- misc florals for detailing

Instructions

1. Lay out your driftwood pieces to form the shape of the arch you would like to create. This helps you determine how much wood you will need, and mark where pieces will be tied with twine, etc. You might have to bust out the drill at this point, if you have to bolt a few pieces together to make even sides.

2. Ask dog to move out of the way for 400th time. Then forgive him because he’s so freaking cute.

3. Split your cement bag in to both buckets. Add water (as instructed on bag - less is more) and stir quickly to mix thoroughly. Once mixed, insert end of base arch to each bucket. Tie to tree or secure so it won’t blow over. Yes, we’re arch professionals here - we tied to a nearby tree and prayed for no wind :)


{oh hey Jonny!}

4. Once the cement has set and your arch bases are secure, you can do a test run with the top section, securing the top piece with twine/floral wire. Depending on the shape, you might have to drill a few more pieces to the top to make everything stay secure. Don’t drill the top of the arch to the bases, though, because remember - you still have to transport this little beauty to the wedding!

5. On wedding day, once the arch legs are in place, take your pieces of fabric and place under each bucket, folding up and over in to the top. This seemed to be the cleanest way to cover the buckets.  Then, re-attach the top piece as you practiced in step 4.

6. Once the arch is fully assembled, you can add your decor. I chose lots of coral charm peonies, pampas grass, hydrangeas for the base and large beach shells and eucalyptus to accent the arch. I didn’t want to add too much, though, because we really wanted to keep it simple and natural looking. Use floral wire/twine/wreath velcro to attach the florals to the arch (I’ve used this method with chuppahs, too) and it will stay secure throughout the day.


{image by Volatile Photography}

If you try this out, please please let me know! I’d love to see it :)

Stay tuned for more pics from C+C’s wedding, being published soon on one of my favorite wedding blogs!


{all images shot in film by jessica burke}

I remember enjoying these tasty, chocolaty treats as a kid when my best friend’s mom would bring over a big terracotta pot filled with pudding, cake and cookie crumbles to picnics. I mean really what is better than chocolate crunchies and pudding? Love. So I wanted to try them out in a mason jar, something you could totally make with the kids, and transfer easily to your family picnics. Here’s what you need to make them at home!

Ingredients:

  • your favorite chocolate cake mix or recipe
  • 8oz mason jars with lids
  • 1/2 package of oreos or chocolate sandwich cookies, crushed in food processor
  • gummy worms
  • chocolate pudding mix


Directions:

  • Pour cake mix in to jars and fill about 1/4. Cook as directed by cake mix using the water bath method we used previously.
  • Prep pudding, chocolate crunchies and gummy worms in little bowls so the kids can have fun filling the “dirt” cups.
  • Once the cake portion is complete, add the gummy worms, followed by the pudding, then more gummy worms, then a layer of chocolate crunchies to look like “dirt”
  • Finish off with a pretty ribbon to match your party
  • If traveling, screw on the mason jar lids and pack in a cooler to bring with you - serve and enjoy!

A fun idea to serve these is by using wooden spoons and painting the handles silver, so they resemble little shovels.

Have fun :)


{all images shot in film by jessica burke}

I am a sucker for breakfast food - give me a bacon, egg and cheese any time of day and I’m a happy girl. whenever we go back east, my mother-in-law always makes this amazing casserole for us, something that can easily be made ahead the day before, and it’s a yummy breakfast that I seriously look forward to. so of course, the next question was, could it be made in a jar? and the answer is yes. bake these little babies ahead of time and throw a lid on and you’ve got yourself a delicious breakfast on the go. count me in! and they’re easy as can be. how adorable would these be as little take-aways for the day-after-the-wedding brunch? here’s how to make them:

ingredients
4-oz mason jars
6 eggs
1/2-3/4 cup milk
pre-made pie crust or crescent roll dough
breakfast sausage roll
1 bag of shredded cheddar cheese
salt & pepper, to season

directions
1. set oven to 375

2. set up your water bath, like we did for the s’mores cupcakes

3. cook your breakfast sausage and drain excess oil. set aside.

4. cut your crescent dough/pie crust in to small pieces and push to bottom of mason jars. throw in oven for 5 minutes to start “cooking” the dough.

5. whisk eggs and milk in a bowl, add salt & pepper to your liking. I don’t like pepper so I never add it.

6. add a few pinches of shredded cheddar cheese to each jar. pour the egg/milk mixture over the cheese, leaving about 1/2″ at the top of each jar for the casserole to rise, then add about 2-3 tbsp of sausage to each jar pushing through the mixture. note - it doesn’t have to be in this order, this just worked best for me.

7. bake at 375 for about 15-20 minutes or until the casseroles are just starting to brown. remove from oven and enjoy!

these can totally be made with anything under the sun - crispy bacon, lots of veggies, you name it.


{all images by jessica burke}

this little project was one of the easiest things ever. it’s a bit tedious to set up, but other than that, it’s pretty and colorful and fun - especially for a wedding favor or birthday party treat. here’s what you need to do!

ingredients:
white cake mix (or your favorite white cake recipe)
food coloring
4 small bowls
spoon
4-oz masons
white frosting
pretty sprinkles

directions:
1. mix up your white cake mix according to directions.
2. pour in to your separate bowls and add 1-2 drops of food coloring in each. stir well to mix the color.

3. pour about 3 -4 tablespoons of each color in to your mason jars, layering each color as you move up towards the top. leave about 1/4 cup of space towards the top of the jar to leave room for the cake to rise.
4. cook as directed, using a “water bath” as we did with the s’mores cupcakes
5. remove from oven and let cool off, then frost each cupcake and add sprinkles to your liking.

6. serve and enjoy!

my favorite part about this project was being able to see the pretty colors through the jar, but when you used a fork to take a bite from the actual cupcake, there was such a pretty “tie dye” effect inside, too!


{all images shot in film by jessica burke}

I’d seen this idea swirling around pinterest for a while and Jessica and I decided to give it a go a few weeks ago when we were in mason jar craft mania land. the result? super cute, super easy, and super green. saving $ is key these days, and every time we buy lunch out it adds up - these mason jar “to-go” salads are a convenient way to bring your lunch to work, and you can just bring the jar home at the end of the day to use again. and by layering the dressing on the bottom in between the cheese/nuts and lettuce, you eliminate the “soggy lettuce” that can typically happen otherwise. here’s how you can do it:

ingredients:

  • 1/2 qt. mason jar (or any size to your liking)
  • all the items you’d typically put in a salad - in this case, I used strawberry vinaigrette dressing, goat cheese crumbles, candied walnuts & dried cranberries, and mixed greens
  • optional: baker’s twine
  • optional: plastic fork

directions:

1. pour your dressing in to the bottom of a clean, dry mason jar
2. add the nuts & cranberries, followed by the cheese crumbles. make sure to make an even layer as this will prevent the dressing from getting to the leaves and making things soggy.

 3. add the mixed greens and secure the jar with the lid and seal.


4. optional: tie a plastic fork to the jar with bakers twine or ribbon to make it pretty and convenient.
5. when ready, shake the jar to mix all ingredients, open and enjoy!


{all images by jessica burke}

i have always been more of a salt/savory person than sweets, but s’mores cupcakes are one of my dessert weaknesses. i have been wanting to try the whole “cooking in jars” thing for a while now, so decided to see if i could cook s’mores in a mason jar for a portable and pretty treat. wouldn’t these be a fun alternative to a s’mores bar for your wedding? you could make them all beforehand (please enlist help of bridesmaids and don’t take this on the day before your wedding!) and leave them as lovely little favors. here’s how you can make them yourself :)

materials/ingredients:
note - the marshmallow frosting recipe and directions are derived from annie’s eats

  • chocolate cake mix {or follow your favorite chocolate cake recipe}
  • 1½ cups graham cracker crumbs {about 1 box graham crackers}
  • ¼ cup sugar
  • 5 1/3 tbsp. unsalted butter, melted
  • candy thermometer
  • 8 large egg whites, at room temperature
  • 2 cups sugar
  • ½ tsp. cream of tartar
  • 2 tsp. vanilla extract
  • 2-3 bittersweet chocolate candy bars
  • 24 4-oz (mini) mason jars
  • cookie pan or deep cooking pan lined with water
  • kitchen torch

directions:
1. preheat oven to 350

2. prep your mason jars by cleaning and drying before use and line on your cookie sheet or cooking pan with about 1/2″ of water (enough to cover at least 1/2″ of the mason jar bottoms)

3. using a food processor (or a baggie and meat tenderizer/rolling pin) crush the graham crackers in to consistent crumbs

4. combine graham cracker crumbs, sugar and butter in a small bowl and place ~1 tablespoon of graham cracker mixture in to the bottom of each prepped mason jar.

5. using a spoon {or whatever you have handy}, flatten the graham cracker crumbs to the bottom of the jar so they’re nice and compact, making your “base” for the cupcakes.

6. bake the graham cracker mixture in masons for 5 minutes. remove from oven (duh).

7. break your chocolate candy bar in to bits and put a little piece in each jar on the top of the graham cracker mix before adding the chocolate cake.

8. mix and prep your chocolate cake mixture as the box directs (or your favorite chocolate cake mix).

9. pour chocolate cake mix in to jars, filling about 2/3 full. bake about 18-20 minutes and use a toothpick to check if they’re ready, then remove from oven.

10. marshmallow recipe from annie’s eats - i had never made my own marshmallow before, so i found this to be the most user-friendly, though i’ll admit i used a lot more cream of tartar to make it “set”. To make the frosting, combine the egg whites, sugar and cream of tartar in the top of a double boiler. (Note: I just set my clean, dry mixer bowl over simmering water, to avoid dirtying two bowls.) Heat the mixture, whisking frequently, until it reaches 160° F with an instant-read thermometer. Transfer the mixture to the bowl of an electric mixer fitted with the whisk attachment. Whisk starting at low speed and gradually increasing to medium-high speed until stiff, glossy peaks form. Mix in the vanilla until combined. or hey - don’t want to make your own marshmallow frosting? i won’t judge you if you just use a jar of marshmallow fluff :)

11. spoon frosting on to top of mason jar cupcakes - you can swirl it around a bit to make it look pretty - then using your kitchen torch, lightly “toast” the marshmallow frosting to give it a slightly browned look.

note - if using as wedding favors, apply the lids to your mason jars so guests can easily transport them home, or have them readily available near the jars so guests can add them if they don’t eat right away.

enjoy!

as promised, here is the full video tutorial (as featured on style me pretty yesterday) to make your own pretty cocktail umbrellas. they’re easy and a fun way to tie in some of your wedding colors down to the cocktail accessories :)

thanks again to Steph & Robin Killip of Bubblerock Studios for filming and pulling this video together for me! to see more DIY videos, click here.


{image by Michelle Drewes}

remember those pretty pink masons from last week’s feature on the glitter guide? well they’re pretty much the easiest things to make, so today i wanted to give a little behind the scenes information on how you can create them yourself!

materials needed:

  • Clear mason jars (can purchase at local hardware store)
  • Spray paint (I used acrylic paint in shades of pink, but any kind will do!)
  • Washi tape (the gold tape I used is from Paper Source)
  • Cardboard box, paper bag, or newspaper to protect surface from spray paint

directions:
1. Wash your mason jars and dry thoroughly.
2. Arrange jars side-by-side on a paper bag or cardboard box, open-side up with lids and seals removed.


{personal iphone image altered with instagram, my username is ‘lovelydetails’ if you want to follow along}

3. Spray jars with even strokes, moving quickly to prevent dripping. Make sure all sides are covered evenly. Let dry. Depending on the kind of paint used, the drying time can vary, taking anywhere from 30 minutes to 3 hours.
4. Once dry, move all jars to your prep area. For an added detail, wrap a strip of washi tape around the jars. Trim with scissors to ensure a clean line.

5. Fill with water and enjoy with pretty flowers or use for your décor of choice! (Note: It is not recommended that these be used for food or drink because of the spray paint.)

pretty easy, right? who said the mason jar can’t be trendy? not this girl :)

happy monday!

20120206-132202.jpg
{image by Michelle Drewes}

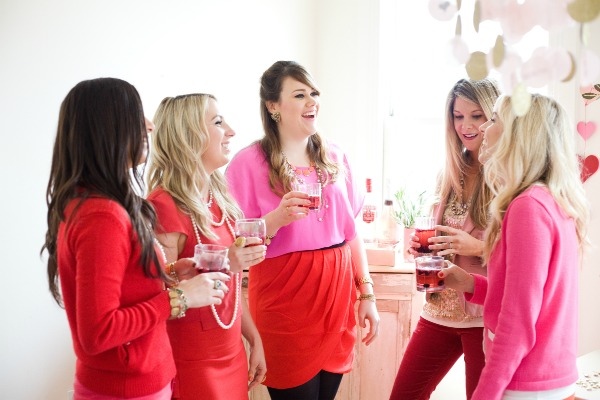
Remember a while back I was mentioning a fun little birthday morning I spent with the Glitter Girl ladies? The Valentine’s Girls’ Night In feature is up today, so make sure to visit and leave some love . I was responsible for the florals, color blocking mason vases, chandelier, paper goods, LOVE letters and helped with the styling. Needless to say, it was a fun experience!

And yes, that’s me up there, second in from the right (next to the gorgeous Taylor), rocking my Forever 21 frocks with my Louboutins. I told the girls, that’s how I roll, and they were totally OK with that.

When I get back from vacation I’ll be sure to post all the DIY goodness, but in the meantime, here are a few free downloads so you can print your own invites and host your own girls’ night in!

20120206-133342.jpg

20120206-133358.jpg
I designed these in color and black and white so you can take your pick - enjoy!


{all images taken by me with my personal camera. please credit if you share elsewhere!}

if you’re in the midst of cleaning out your craft closet, (or in my case, valentines day exploded all over the apartment in the form of ribbons and glitter), you might be looking for a fun way to store all of your leftover “stuff”. sometimes i have a pretty piece of ribbon left, but i only have a few yards and i just don’t have the heart to throw it away, so i usually stick it in a jar or bag with the rest of the leftovers.

today, as i was cleaning up the kitchen, i spotted our overflowing bag of wine corks. i’ve been meaning to make a cork board or something fun, but haven’t had the time or inspiration to get going on that yet. so i thought, wouldn’t those corks make a perfect little ribbon spool? and today’s DIY cleanup project was born.

materials:
scissors
wine corks (it’s even more fun if you drink the wine as you go)
tape (i used washi tape because it’s easier to remove without leaving a sticky mess, and it looks pretty)
leftover ribbon
pretty jar or container for the completed “spools”

instructions:
1. grab a wine cork and tape one end of the ribbon to the cork. some ribbon does not need to be taped, just use if needed.
2. wrap the ribbon tightly around the cork, secure with tape. 

pretty easy, right? and just think of all the room you just saved. throw your pretty jar of “spools” on your desk or in your craft cabinet and you’re good to go!

happy crafting :)

featured and seen in